All websites we create come with their own, easy to use Content Management System (CMS). This enables clients to update their website quickly and easily, whenever they wish.
Whilst this is a very simple system we also provide monthly maintenance options for those who prefer this to be taken out of their hands allowing them to concentrate on what they know best. Running their business!
During the development of a website we will send you the location of your CMS pages along with login details.
We are constantly updating our 'Standard Website' which utilises this CMS. Therefore, for older websites there may be features explained here which are not implemented on your website. We can implement these if required. Simply get in touch with us and we will let you know how we can go about this.
Likewise we can develop extra features and functionality in to any website. In these cases, some areas may not be of the standard set-up so instructions may differ from those described here.
Jump to the section you need:
SETTINGS | PAGES | CONTENT EDITOR | META / SEO | ADDING IMAGES | SERVICES | BlOG / NEWS | PAGE ORDERING | GALLERIES
SETTINGS | PAGES | CONTENT EDITOR | META / SEO | ADDING IMAGES | SERVICES | BlOG / NEWS | PAGE ORDERING | GALLERIES
WEBSITE SETTINGS
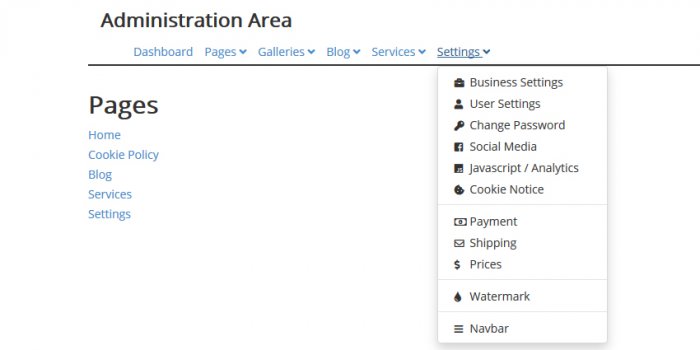
When logged in you will see a 'Settings' tab. This is where much of the technical side of the website is controlled. Here you can:
- Change User email address
- Change login password
- Update Social Media links - Enable social media links and add links to your relevant profiles.
- Add JavaScript code throughout the website. This will generally be for analytics code to track visitor numbers and activity to your website.
- Add/Edit a Cookie notice. When added a Cookie notice will appear automatically to your website visitors. Here you can amend that message. A Cookie page is automatically available in the 'Pages' set up. The Cookie message is set up to allow your visitors to Agree to your Cookie and Privacy Policy. An important inclusion in terms of GDPR compliance.
Other items under the 'Settings' tab are for the Shopping system. This was developed mainly for use by Photographers. However, can be used as a basic shopping system for other business types. We can integrate a more detailed Shopping System for Online Shops if required.
We will cover the Shopping set up later in this article.
Creating pages
There are a number of Sections to the CMS to create relevant pages. These include Pages, Services, Galleries and Blog or News. These sections are used to create all content throughout the website and all work in a very similar way.
To Edit a page go to the relevant selection and click. this will open up a drop down. Click to 'Add New Page' or 'View All Pages'. 'View All' lists each page within that section and shows an Edit or Delete link.
Remember to Save regularly when creating or editing a page so as not to lose information you have added.
PAGES
Unlimited Pages can be created using the system. This is ideal for creating general content and information pages such as About, Terms, Testimonials, Privacy Policies etc.
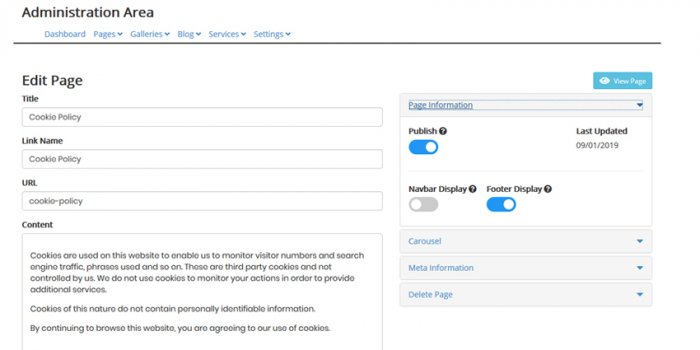
Each page link can be set to appear in the main navigation bar in the Header and/or in the Footer. For example, you may want an About link to appear in both the Header and Footer but a Terms or Privacy link to appear only in the Footer.
Each option can be independently selected here under the 'Page Information' link to the right hand side when editing the page.
A page can also be Published and Unpublished from this section. This is ideal where you want to display the same information periodically.
Click the Pages tab in the nav bar. Select Add new Page to give it a try.
When creating or editing a page you will create a:
- Page Title - This is also used in the META section of the page for SEO purposes. Make the title descriptive and include a relevant key phrase.
- Link Name - This is the name of the link that will appear in the navigation areas.
- url - This is the folder name for the page you are creating and again is used for SEO purposes. make the url descriptive similar to or the same as the title. I.e. this will create a folder name such as www.your-domain-name.co.uk/url-name-you-enter/
- Page content - Content should be of decent quality and length. Keep it to the subject of the page and relevant to the Title. Include within the content, any phrases you expect to be used to find the page on search engines. use the phrase used in the title within the content and headings.
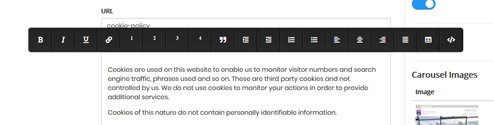
There is a formatting toolbar on the Content Editor which is the same for all pages created whether they be Pages, Services or News or Blog.
Most tools here are self explanatory and similar to tools used in any text editing software.
Headings
Where you see numbers 1, 2, 3 and 4 these add in HTML tags h1, h2, h3 and h4 respectively. Simply highlight the text you want to make a heading and select the relevant number.
1 should be the most important heading on the page with 4 being the least. All 'h' tags are styled during the development of the website. If you want these re-formatting please contact us.
Hyperlinks
You can create links within the text using the linking tool (4th icon from the left on the toolbar). Simply highlight the text you want to make a link, click the Link icon and enter the address of the link. Click the tick to save.
If you are linking to an external website you must include the full address in the Link field including the http:// or https://. It is advisable to copy and paste the ful url (address) from the address bar. For external websites we recommend selecting the check box 'Open in a new window' before clicking the tick to Save.
If you are linking to a page on your website it is better to omit the first part of the address. For example if you want to link to a page called /my-page-to-link/ at http://www.mywebsite.co.uk/my-page-to-link/ you only need to copy and paste the data from and including the first slash. Therefore enter /my-page-to-link/ in the link field.
This is useful to direct people to a contact page or other important information. To link to a contact page the details to copy would generally be /contact/
Tables
You can add responsive tables to your content to display tabular data, useful for lists etc. The tool second to the end (right) is used for this.
Click
the tool and hover over the pop up squares. These allow you to select
the number of rows and columns for your table. Select the number you
want by clicking the last box. For example, 3 squares wide and 2 down
would give a table with 3 columns and 2 rows.
Enter the data you want in each table cell.
The table will respond depending on the device being viewed on so columns will drop to the next row on smaller devices.
Raw HTML
The raw HTML code can be edited on each page. This should really only be used by those competent in HTML editing but is useful from time to time. If you require any help please let us know what you are trying to achieve.
The HTML can be accessed from the </> icon to the far right of the toolbar. Click it and the code that makes up the page content opens up. This only affects the content and not the page structure or styling. Find where you want to add or edit code, enter then click Submit to save.
When setting up a new Page, Service or Blog post META, Title and SEO details are added automatically from the Title field. Ensure the title is relevant and contains the main phrase based on the content and the page will be relatively optimised.
These details can be tweaked from the 'META Information' link to the right hand side of the Editor. Expand on the information previously added to the title and description fields. Add the same details to the keywords field and separate each word with a comma. Do not repeat words in the Keyword field and remove any common words such as it, on, this, and that which have no search relevancy.
Remember to click Submit regularly to Save any changes. The page can remain 'Unpublished' until you are happy with the content and set up.
Don't forget to 'Publish' to set the page live.
Click the 'Save Updated Order' button that appears.
Services can be re-ordered within themselves in the same way from the 'View All Services' pages.
Services can only be reordered within themselves and not intermittently within other page types. You can re-order the whole Service block and other Sections from Settings > Navbar
All main 'Sections' of pages can be re-ordered here.
With all pages you have 3 separate
options to upload images. These can either be a large 'Splash' photo
across the top of the page, a carousel feature with changing images,
images set the the right or left ofm the main content (depending on how
the site was originally set up) or images in-line within the main page
content.
For the large Splash image or
carousel, select the Carousel link to the right hand side. Here you can
upload images (usually up to 6 depending on how we set it up).
If you upload a single image that will remain as a static image on the
page. Uploading more will display as a carousel with transitions between
each image. The size and transition will be set by us during website
development to ensure consistency throughout the website. if you prefer
these to display differently then please contact us.
Carousel Images and Captions

For
each image you can add a Caption title and Caption text. Click the
small 'Edit' icon alongside each image to add the Caption details. These
will be displayed in an overlay on the image when viewing the page. The
style of the caption and overlay will be determined by us during
development.
You can delete an image using the
red cross alongside. Deleting will also delete any caption detail.
Images within a carousel can be ordered by entering this numerically in
the box provided.
Inline Images within Content Area
You
can add images within the main content area to display in line with the
text. Click the mouse within the content box and Enter to start a new
line.

A
+ sign will appear outside the editor to the left hand side. Click this
and two icons will show. One is a camera icon. Click this to upload a
photo or other image.
You will also an 'Images'
button to the bottom of the Edit page. This allows you to upload up to
three images which will display somewhere on the page as set during the
development of the website. The number and positioning of images can be
changed by contacting us. They are usually set to appear to the Right,
Left or Below the main content block.
Depending on your website set up or requirements this may be named 'Products' or for our Rental Property websites 'Rooms' or 'Properties'.
The 'Services' section works in much the same way as 'Pages' although there are a couple of slight differences.
Firstly, there is no control for adding the link to the Header and/or Footer navigation. This is because Services are located under the main Services tab on the front end of the website. Therefore the Services link will appear when one is added and a drop down automatically created with the new Service link showing below.
All this is automatic so no need to be concerned with it. However, if you want to change how this displays or reads then please speak to us.
As well as the field on the Pages set up there is also a Summary field. This will show on the Home page under the 'Featured' section and on the main Service list page.
Services also differs from Pages in that you can set 'Featured' links on the Home page. This will display in blocks with a cover image and short summary if added. We can style up this Featured section during development and would usually display three or four main blocks horizontally but can add others.
To add a Featured service to the home page open the 'Display Settings' link to the right of the editor and turn on 'Display on Front Page'.
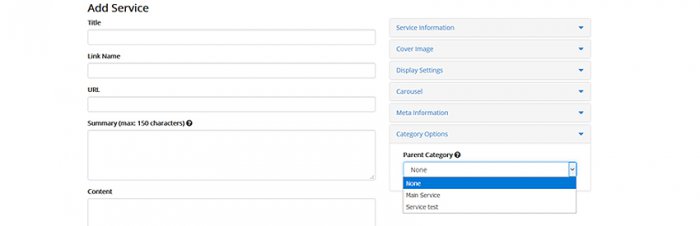
Service Categories
With Services you also have Category options which go one level of Main Category > Sub Category.
Services can be added here and this automatically creates a Main or Parent Category unless a 'Parent Category' is selected from the drop down as shown in the image above.
- To create Services go to Services > Add New Service
- To create a Main or Parent Category, complete all details, switch on Publish under 'Service Information' and select 'None' from the Parent Category Section. SUBMIT
- To create a sub category, complete all details as above, select a main category already created from the Parent Category drop down. SUBMIT
very straight forward. Simply add a descriptive title, url (as above) and the post content. Images can be added within the content as outlined above .
SEO and META information can be expanded upon also under 'META Information
A Cover Image can be uploaded to display in the main blog list.
We can set blog or news posts to automatically post to social media profiles such as twitter and Facebook Business pages. please speak to us about this if required.
We can also add social media share buttons to display with each post.
These are for those businesses wishing to display a photographic portfolio and can be used by any business type.
The facility was developed mainly with photographers and other creative services in mind but can be used for many such as builders, beauty salons, holiday websites, accommodation and any wishing to showcase their work or offering.
Go to the 'Galleries' tab and select 'View All Galleries'
There are tow types of Gallery and the links to each can be seen at the top right of this page, Portfolio and Shop.
Any existing galleries can be Edited, Viewed or Deleted here. The display order can also be changed by dragging and dropping to the required location.
- A Portfolio gallery is to showcase your work to the public although you can still password protect any gallery.
- A Shop gallery allows you to sell photographs online. mainly for photographers but can be used as a basic ecommerce system for other business types.
Portfolio Gallery
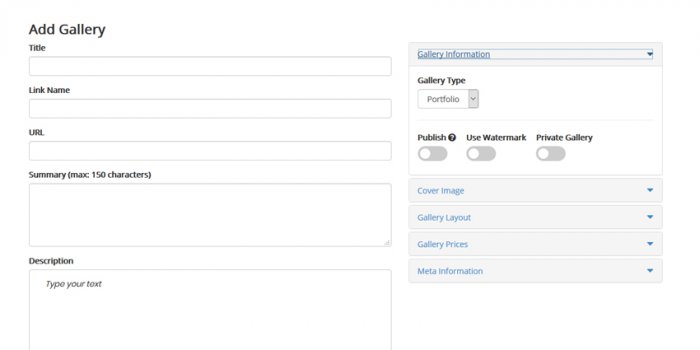
To Create a gallery go to Galleries > Add New Gallery or Galleries > View All Galleries > Add gallery button
Under 'Gallery Type' ensure the correct type is selected. It defaults to Portfolio.
As with creating a new page or Service, complete any relevant information in the form fields.
Under 'Gallery Information' select the Gallery Type, Publish and select whether it should be a Private Gallery. If you turn private on a password field will appear. Enter a password here. However, Portfolio galleries would normally be left as Public.
Watermark Images
Also under this tab is a Use Watermark option. This adds a watermark to all images during the upload process. The Watermark text is taken from the Business Name set by us during the set up of the website. However, you can change the Watermark text if you wish under Settings > Watermark. Watermarks cannot be removed from images once uploaded as the text is written in to the image itself. To remove, first delete any relevant images, switch off 'Use Watermark' for the gallery and re-upload any images.
Under the other tabs to the right hand side you can add further settings for this gallery:
- Cover Photo - Upload a cover photo for use as a thumbnail in the Galleries list
- Gallery Layout. Select from a number of layout options including Default which are consistent rows of images, Grid, Columns or options with small thumbnails in different positions. Try each to see which you prefer!
- Gallery Prices - Only used in Shop galleries. if you wish to use this switch the Gallery tyoe to Shop. We will explain the Prices set up in the next section.
- META information - As with pages and Services this is used for SEO purposes to expand on the information added in the text fields earlier.
Once all settings are added click Submit.
Then you can upload your images.
Upload Images
Scroll to the bottom of the page. Here you will see any images already uploaded and the 'Edit Images' button. Click this.
You will then see an Upload button. Click the Upload button to add images. Browse your computer and select any number of images to your set maximum shown under Uploads Available. If you require a larger image gallery capacity, please contact us.
Images are displayed in to order they are uploaded. However, you can reorder them numerically/alphabetically or reversed if required.
Shop Gallery
Developed mainly for use by photographers but can be used by other business types. Tweaks maybe required for this to work for others as a basic eCommerce feature but please discuss with us as other options are available.
Shop galleries work in exactly the same way as Portfolio apart from the payment options. In many cases a photographer would also set these galleries to private and require a password to view.
To use a Shop Gallery you first need to set up the Prices and Payment settings.
Shop Settings
As standard all payments are processed using PayPal. We can set up other payment processing options if required.
To add your PayPal account go to Settings > Payment. Add your PayPal email address and click Update.
Under Settings > Shipping you can set your delivery prices which will automatically appear on the check out page and included in the final cost. Add your own Shipping options such as Freepost, First Class, Second Class, Courier etc. along with prices.
Finally, set up your prices in Settings > Prices. Add an Item Name and price. For photographs this may be, for example, 6" X 4" framed - £2.99, 10 X 6 unframed £1.50. For most you can ignore the Category field.
Many clients require bespoke solutions for pricing and Shipping. Therefore please contact us if you require something different. For example you may wish to set delivery costs based on weight or quantities. 10 photos all in frames will have a higher cost than 10 photos without frames. We can develop any requirement in to a website so please feel free to discuss with us. We have added the above basic set up as standard.
There is an option to include Free Delivery for any items. This may be, for example, where you are selling digital images that are emailed to the client.
Add a Shop Gallery
Once you have added all your eCommerce settings above, you can add your first Shop gallery.
Under Galleries > Add New Gallery, first ensure Shop is selected under Gallery Information > Gallery Type. Add all other information as with a Portfolio Gallery.
prices added previously in Settings must be selected fro each gallery separately. this is because you may want to add different prices for the same size images depending on an event. For example, you may change extra for images taken at a corporate event than for the same size image at a wedding.
Under the Gallery Prices tab to the right hand side click +View Price List. This opens up the options previously added. Select each price individually by clicking the green + icon or click the Add All button to add all prices.
Once added you can also select each as 'Digital' which would give free shipping.
Remember to select prices for each Shop gallery